
Can anyone give me a Mochifitter Tutorial Video?
-
agree
-
Bad at videos, but I can do text and photos.
TL;DR Mochifitter is a very souped up Alterith/etc clothing resizer that uses Blender to refit a piece of cloth designed for one avatar to another. Downside is you need extra parts, a "reverse" script for the avatar the clothing is originally for, and a "forward" script for the avatar you want to use it on. It comes with reverse and forward scripts for Manuka and a few others, but generally you'll need to source others from either the original avatar creator or a Very dedicated fan
Setup
Download Mochifitter + whatever scripts you need for the avatars you want to use.
Thread with basically all the Mochifitter profiles posted so far
Heads up that some avatars only have forward scripts at the moment, so you won't be able to use clothing designed for them on other avatars, but will be able to do the reverse (someone else's clothing -> that avatar)
Everything is a plain unitypackage, just open and let Unity do the work. Avatar script unitypackages should automagically put themselves in the right place without a fuss.Preparation/Use
Tools->Mochifitter to open its menu.
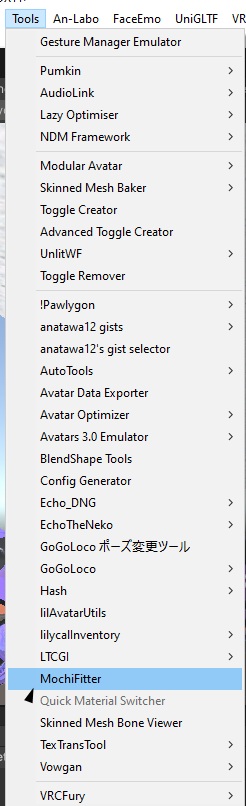
You likely have less items in this menu than me. Don't worry about it.The first time you load up MochiFitter, you'll need to install its copy of Blender. Hit the button and walk away, it'll take a while. ~20min? I forgor TBH
Once you have the full menu open, there's not a whole lot you can screw up, it'll let you know if/when you do something wrong.
Here's two different ways the menu might look, depending on your chosen target/source avatar:
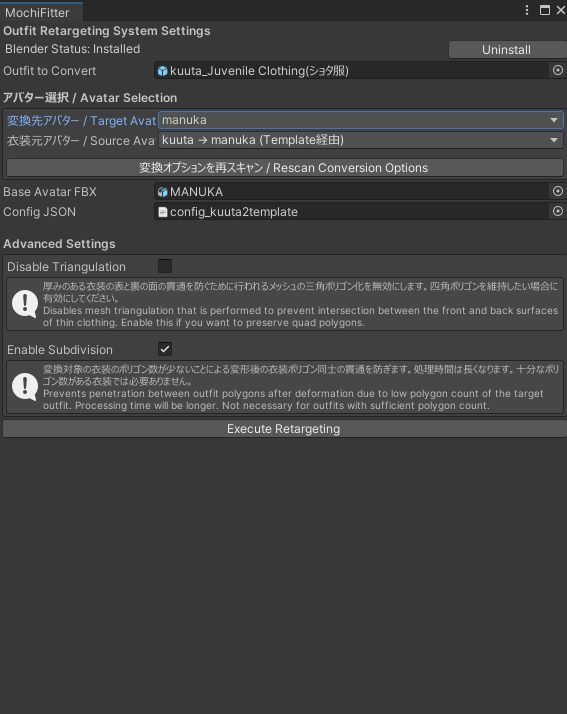
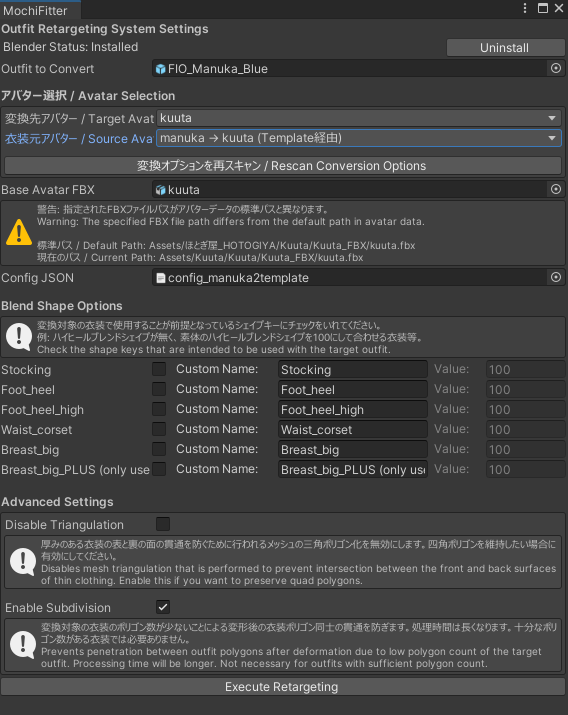
Resize the menu if you're having trouble seeing all the options at any one moment.From top to bottom:
Outfit to Convert: Prefab directly from your project files (i.e. not from your hierarchy/already on a model! This took me a minute to get used to as well), drag and drop into the spot
Target Avatar, Source Avatar: Avatar you want to use the clothing on, avatar the clothing is designed for. Dropdowns, nice n' easy.
Base Avatar FBX: If you leave your models in the exact folders they came from, MochiFitter will find the file itself and autofill this spot, see the first image of the menu. If you move them around (I am a serial mover of files) you'll have to manually drop the FBX of the target avatar from your project here. It'll let you know if it's completely wrong (i.e. it can't find a certain mesh in the file) or where it expected your file to be.
Config JSON: Don't touch.
Blend Shape Options: Will only show if your source avatar has common adjust blendshapes. (See how it doesn't show on Kuuta->Manuka because Kuuta has none, but does for Manuka->Kuuta because of the booba and high heels etc) Click the box and adjust the blendshape number if your clothing expects something that isn't default. MochiFitter does not care about shrink blendshapes! Don't worry that they're not an option, just use the ones on your target avatar afterward if needed.
Advanced Settings: Unless you know what you're doing, you probably don't need nor want Disable Triangulation. If your PC's powerful, enable Enable Subdivision, it'll take a fair bit longer but you won't have to worry about clipping on decimated/lower polygon costumes.Hit the button at the bottom!! Time to wait!
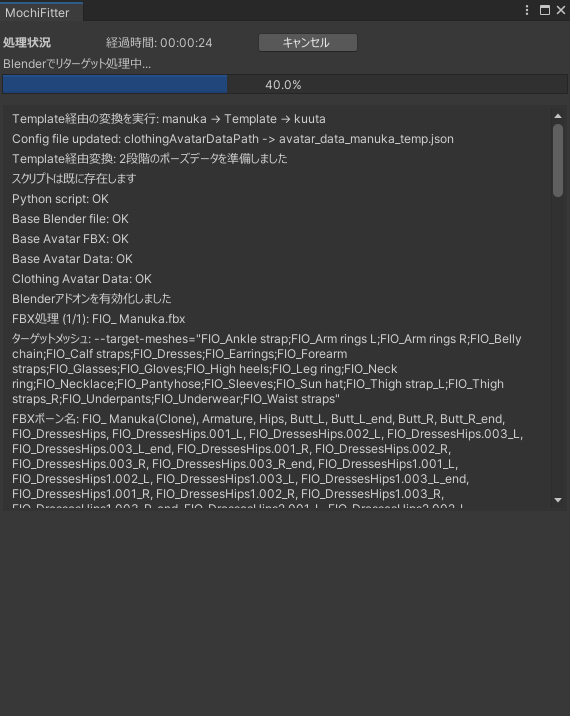
The gray button is Cancel, stopwatch to the left, everything else is just logging what's going on. Stay focused on Unity for fastest results. Manuka->Kuuta example took about 13min and basically all of my free RAM (almost 18GB!) but was also a stupid large costume to start with, I've had costumes only take 2min30 before
Afterward, it should immediately drop you to the folder with your finished files in it. With MA installed, it also sets up the costume for you, so it's literally drag-and-drop onto the avatar. Have fun!
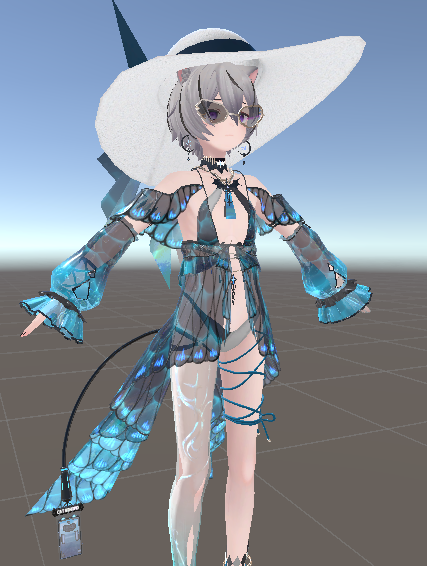
-
Bad at videos, but I can do text and photos.
TL;DR Mochifitter is a very souped up Alterith/etc clothing resizer that uses Blender to refit a piece of cloth designed for one avatar to another. Downside is you need extra parts, a "reverse" script for the avatar the clothing is originally for, and a "forward" script for the avatar you want to use it on. It comes with reverse and forward scripts for Manuka and a few others, but generally you'll need to source others from either the original avatar creator or a Very dedicated fan
Setup
Download Mochifitter + whatever scripts you need for the avatars you want to use.
Thread with basically all the Mochifitter profiles posted so far
Heads up that some avatars only have forward scripts at the moment, so you won't be able to use clothing designed for them on other avatars, but will be able to do the reverse (someone else's clothing -> that avatar)
Everything is a plain unitypackage, just open and let Unity do the work. Avatar script unitypackages should automagically put themselves in the right place without a fuss.Preparation/Use
Tools->Mochifitter to open its menu.
You likely have less items in this menu than me. Don't worry about it.The first time you load up MochiFitter, you'll need to install its copy of Blender. Hit the button and walk away, it'll take a while. ~20min? I forgor TBH
Once you have the full menu open, there's not a whole lot you can screw up, it'll let you know if/when you do something wrong.
Here's two different ways the menu might look, depending on your chosen target/source avatar:
Resize the menu if you're having trouble seeing all the options at any one moment.From top to bottom:
Outfit to Convert: Prefab directly from your project files (i.e. not from your hierarchy/already on a model! This took me a minute to get used to as well), drag and drop into the spot
Target Avatar, Source Avatar: Avatar you want to use the clothing on, avatar the clothing is designed for. Dropdowns, nice n' easy.
Base Avatar FBX: If you leave your models in the exact folders they came from, MochiFitter will find the file itself and autofill this spot, see the first image of the menu. If you move them around (I am a serial mover of files) you'll have to manually drop the FBX of the target avatar from your project here. It'll let you know if it's completely wrong (i.e. it can't find a certain mesh in the file) or where it expected your file to be.
Config JSON: Don't touch.
Blend Shape Options: Will only show if your source avatar has common adjust blendshapes. (See how it doesn't show on Kuuta->Manuka because Kuuta has none, but does for Manuka->Kuuta because of the booba and high heels etc) Click the box and adjust the blendshape number if your clothing expects something that isn't default. MochiFitter does not care about shrink blendshapes! Don't worry that they're not an option, just use the ones on your target avatar afterward if needed.
Advanced Settings: Unless you know what you're doing, you probably don't need nor want Disable Triangulation. If your PC's powerful, enable Enable Subdivision, it'll take a fair bit longer but you won't have to worry about clipping on decimated/lower polygon costumes.Hit the button at the bottom!! Time to wait!
The gray button is Cancel, stopwatch to the left, everything else is just logging what's going on. Stay focused on Unity for fastest results. Manuka->Kuuta example took about 13min and basically all of my free RAM (almost 18GB!) but was also a stupid large costume to start with, I've had costumes only take 2min30 before
Afterward, it should immediately drop you to the folder with your finished files in it. With MA installed, it also sets up the costume for you, so it's literally drag-and-drop onto the avatar. Have fun!
-
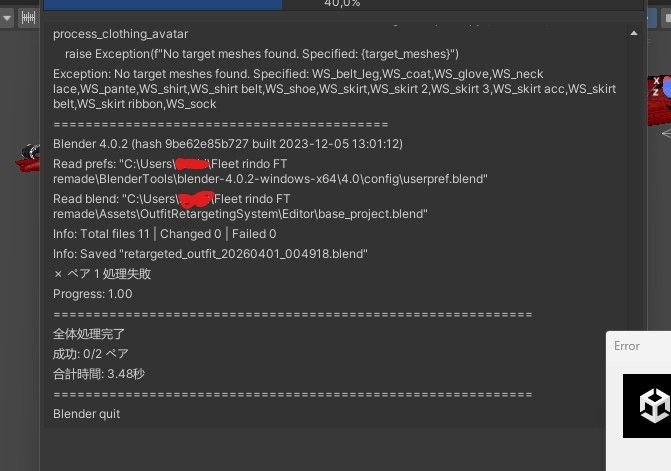
every time i try it failed no matter what, i tried multiple avatar, outfit, even on new project and it just fail, and i don't know why, can someone help me ?
-
I'm having the most random issue - I import the Mochifitter unity package into my unity project & it isn't appearing under the tools menu. Is there something I am missing? I have read through the documentation I found/in the file and don't see what I'm doing wrong
-
I'm having the most random issue - I import the Mochifitter unity package into my unity project & it isn't appearing under the tools menu. Is there something I am missing? I have read through the documentation I found/in the file and don't see what I'm doing wrong
@YukiaMariaVRC no same i cant figure it out
-

i tried to convert mine but this error pops up idk what to do . 3.
-
I'm having the most random issue - I import the Mochifitter unity package into my unity project & it isn't appearing under the tools menu. Is there something I am missing? I have read through the documentation I found/in the file and don't see what I'm doing wrong
@YukiaMariaVRC same, i downloaded the profile for moln and when adding the package doesnt show on tools
-
Bad at videos, but I can do text and photos.
TL;DR Mochifitter is a very souped up Alterith/etc clothing resizer that uses Blender to refit a piece of cloth designed for one avatar to another. Downside is you need extra parts, a "reverse" script for the avatar the clothing is originally for, and a "forward" script for the avatar you want to use it on. It comes with reverse and forward scripts for Manuka and a few others, but generally you'll need to source others from either the original avatar creator or a Very dedicated fan
Setup
Download Mochifitter + whatever scripts you need for the avatars you want to use.
Thread with basically all the Mochifitter profiles posted so far
Heads up that some avatars only have forward scripts at the moment, so you won't be able to use clothing designed for them on other avatars, but will be able to do the reverse (someone else's clothing -> that avatar)
Everything is a plain unitypackage, just open and let Unity do the work. Avatar script unitypackages should automagically put themselves in the right place without a fuss.Preparation/Use
Tools->Mochifitter to open its menu.
You likely have less items in this menu than me. Don't worry about it.The first time you load up MochiFitter, you'll need to install its copy of Blender. Hit the button and walk away, it'll take a while. ~20min? I forgor TBH
Once you have the full menu open, there's not a whole lot you can screw up, it'll let you know if/when you do something wrong.
Here's two different ways the menu might look, depending on your chosen target/source avatar:
Resize the menu if you're having trouble seeing all the options at any one moment.From top to bottom:
Outfit to Convert: Prefab directly from your project files (i.e. not from your hierarchy/already on a model! This took me a minute to get used to as well), drag and drop into the spot
Target Avatar, Source Avatar: Avatar you want to use the clothing on, avatar the clothing is designed for. Dropdowns, nice n' easy.
Base Avatar FBX: If you leave your models in the exact folders they came from, MochiFitter will find the file itself and autofill this spot, see the first image of the menu. If you move them around (I am a serial mover of files) you'll have to manually drop the FBX of the target avatar from your project here. It'll let you know if it's completely wrong (i.e. it can't find a certain mesh in the file) or where it expected your file to be.
Config JSON: Don't touch.
Blend Shape Options: Will only show if your source avatar has common adjust blendshapes. (See how it doesn't show on Kuuta->Manuka because Kuuta has none, but does for Manuka->Kuuta because of the booba and high heels etc) Click the box and adjust the blendshape number if your clothing expects something that isn't default. MochiFitter does not care about shrink blendshapes! Don't worry that they're not an option, just use the ones on your target avatar afterward if needed.
Advanced Settings: Unless you know what you're doing, you probably don't need nor want Disable Triangulation. If your PC's powerful, enable Enable Subdivision, it'll take a fair bit longer but you won't have to worry about clipping on decimated/lower polygon costumes.Hit the button at the bottom!! Time to wait!
The gray button is Cancel, stopwatch to the left, everything else is just logging what's going on. Stay focused on Unity for fastest results. Manuka->Kuuta example took about 13min and basically all of my free RAM (almost 18GB!) but was also a stupid large costume to start with, I've had costumes only take 2min30 before
Afterward, it should immediately drop you to the folder with your finished files in it. With MA installed, it also sets up the costume for you, so it's literally drag-and-drop onto the avatar. Have fun!
This post is deleted!






Hello! It looks like you're interested in this conversation, but you don't have an account yet.
Getting fed up of having to scroll through the same posts each visit? When you register for an account, you'll always come back to exactly where you were before, and choose to be notified of new replies (either via email, or push notification). You'll also be able to save bookmarks and upvote posts to show your appreciation to other community members.
With your input, this post could be even better 💗
Register Login