
LF: Raruh by Torinyan and Limebreaker (and other assets)
-
Raruh Mewka Paws, I got tired of waiting XP
-
YAY
-
Raruh Mewka Paws, I got tired of waiting XP
@sadtreegirl THANK YOUUU
-
Anybody know how to get the Modded Texture (human skin one) to work with the Mega-Chassis?
-
Anybody know how to get the Modded Texture (human skin one) to work with the Mega-Chassis?
@EmiliaSilvie follow the instructions on the video where it shows what to change for the original body texture but just apply that to the body mat for the modded skin instead
-
So at the 3:57 mark, instead of replacing Body with PB_Raruh_Body_Chest_Cutout, I do:
- Go to the Assets[kitsu]\modded\raruh\materials\Variant A folder
- On the body mat itself, I swap the texture out for the texture used on that PB_Raruh_Body_Chest_Cutout mat?Or do I have to do some picture/material stitching? Sorry I'm still learning how to edit models so this is all roughly new to me lol.Okay so I copied the Material settings from the PB_Raruh_Body_Chest_Cutout and put them onto the Material for the modded/human skin material. Le' tiddies are half and half colored rn, all the rest of the body is normal human skin but the titties are still the robot skin.
-
-
damn, well at least it's working now, thank you very much, random citizen!

-
damn, well at least it's working now, thank you very much, random citizen!
@EmiliaSilvie the modded for the mega is a wip
-
@StuffedRavioli you dont need much. i just made a literal color sheet and then just turned off the matcaps (cant remember which ones off the top of my head, i think it was 2 of the three). I did the same already for the FL4T and the B1TTY chests. I just used the same texture. later on today i can check and post exactly how i made it work with a few screenshots
-
@StuffedRavioli you dont need much. i just made a literal color sheet and then just turned off the matcaps (cant remember which ones off the top of my head, i think it was 2 of the three). I did the same already for the FL4T and the B1TTY chests. I just used the same texture. later on today i can check and post exactly how i made it work with a few screenshots
@FemboyWaifu That would be amazing if you could show us how you did it, please and thanks!
-
Also while I'm thinking about how, with that modded texture (human skin one still), how does one change the hair to match up with the hue changes of the body?
-
Okay, sorry for the long wait. Firstly... be careful everyone, Tori is bringing down ban hammer in his server. Friend of mine already got hit. And that also means most likely the other creators have been informed too, so, be on guard.
As for the modded textures - here's how I did the materials for the B1TTY, M.E.G.A. Chassis and FL4T Chest
For the modded textures, and this part works for both skin tones, I dropped the base texture into another art app just to get the color code - for the dark skin it
Light Skin's Hexadecimal code is FFE7DA
Dark Skin's is 63524A
What I did was make a texture thats nothing but that color. You're going to use it for all three.
For the B1TTY: In the material go to Decal, add the color texture to "Decal" and this mask I made into the Decal RGBA Mask. Make sure decal is on. Next go to the Matcaps. Turn off Matcap 1 and 3 to remove the shine since the rest of the skin is very matte, it looks VERY off putting. When I was working on it like 6 friends pointed that out within 5 minutes at an event lol.M.E.G.A. Chassis - add the texture to decal, same way. Turn off Matcap 0 and 3 (2 is blank, but make sure its off too)
FL4T Chest - add the texture to the Main in Colors & Normals. Turn off Matcap 0, 2 and 3.And now they should all have the same (for the light skin tone, might be a little off because i didn't make that one, i used color grab just to get it from the texture in Unity for a friend) as well as the same matte look.
For the hair and anything else to add the color, you'll have to add them to the animations. The problem with almost every Raruh part is the creators just used the original FX Layer and then give that to you and tell you just use that as well as replace the animations with theirs. That's fine if you only have one, or in one case I think all the creator's parts are on the animation. But if you have multiple creator's mods, you're going to have to add them to the animations manually.
So for any additional part if you wanna just add it to what you already have in the animations you need to edit the following to make sure they match with RGB, Emission strength, Lighting strength and Audiolink. For anyone who hasn't done animation stuff, I'll give the TLDR. Make a copy of your model, Add the FX Layer you're going to edit to its Controller in Animator (when you click the model you'll see it in Inspection at the top). Go to animation and you can now find the one you're going to edit. Make sure any material you're going to be adding is active just so you don't have to worry about adding things to it like turning on and off. Now when you hit record, you can edit the material and add it. These are what you're going to want to add on to each one. Make sure that after you put the value in, you hit record again so it saves it. I do it after each one, just to be sure. For the M.E.G.A. Chassis, you need to do this for each one you're using, so Booba_NSFW, Booba_SFW_Side, Booba_SFW_Top, and Tubes you need to do this for, even though they're the same material.
color and color 1 add your emission hue shift (any you want to change colors) (color is 0, color 1 is 100)
emission and emission 1 - go down to Post Processing in the material and in PP Animation. Change Emission Multiplier, 0 for emission, 1 for emission 1.
lighting and lighting 1 - in Post Processing, PP Animation, Change Lighting Multiplier. 0 for lighting, 1 for lighting 1.
audiolink_on_off - go to Audiolink and for the first time stamp (0:00) make sure the Anim Toggle is checked on. at the second time stamp (0:01) make sure its off.Now everything is color matched, lighting matched, emission matched, and set up for audio link
Screenshots to help as wellB1TTY
Mask for Decal

Decal Settings
https://gyazo.com/167d54e6f8754005ab3284ad9bee52b9
FL4T Settings
https://gyazo.com/a73923eb8042060e02375b1fcc1ae675
M.E.G.A. Chassis Settings
https://gyazo.com/863576b9f7ae034f96f00c46d7b2bd7e
Emission Hue Shift Location
https://gyazo.com/0f2a028743d28d178322d103f524533a
Audiolink and Post Processing Location
https://gyazo.com/e6eac0f7f5eec5fc979da00b7a5d78a0 -
Okay, sorry for the long wait. Firstly... be careful everyone, Tori is bringing down ban hammer in his server. Friend of mine already got hit. And that also means most likely the other creators have been informed too, so, be on guard.
As for the modded textures - here's how I did the materials for the B1TTY, M.E.G.A. Chassis and FL4T Chest
For the modded textures, and this part works for both skin tones, I dropped the base texture into another art app just to get the color code - for the dark skin it
Light Skin's Hexadecimal code is FFE7DA
Dark Skin's is 63524A
What I did was make a texture thats nothing but that color. You're going to use it for all three.
For the B1TTY: In the material go to Decal, add the color texture to "Decal" and this mask I made into the Decal RGBA Mask. Make sure decal is on. Next go to the Matcaps. Turn off Matcap 1 and 3 to remove the shine since the rest of the skin is very matte, it looks VERY off putting. When I was working on it like 6 friends pointed that out within 5 minutes at an event lol.M.E.G.A. Chassis - add the texture to decal, same way. Turn off Matcap 0 and 3 (2 is blank, but make sure its off too)
FL4T Chest - add the texture to the Main in Colors & Normals. Turn off Matcap 0, 2 and 3.And now they should all have the same (for the light skin tone, might be a little off because i didn't make that one, i used color grab just to get it from the texture in Unity for a friend) as well as the same matte look.
For the hair and anything else to add the color, you'll have to add them to the animations. The problem with almost every Raruh part is the creators just used the original FX Layer and then give that to you and tell you just use that as well as replace the animations with theirs. That's fine if you only have one, or in one case I think all the creator's parts are on the animation. But if you have multiple creator's mods, you're going to have to add them to the animations manually.
So for any additional part if you wanna just add it to what you already have in the animations you need to edit the following to make sure they match with RGB, Emission strength, Lighting strength and Audiolink. For anyone who hasn't done animation stuff, I'll give the TLDR. Make a copy of your model, Add the FX Layer you're going to edit to its Controller in Animator (when you click the model you'll see it in Inspection at the top). Go to animation and you can now find the one you're going to edit. Make sure any material you're going to be adding is active just so you don't have to worry about adding things to it like turning on and off. Now when you hit record, you can edit the material and add it. These are what you're going to want to add on to each one. Make sure that after you put the value in, you hit record again so it saves it. I do it after each one, just to be sure. For the M.E.G.A. Chassis, you need to do this for each one you're using, so Booba_NSFW, Booba_SFW_Side, Booba_SFW_Top, and Tubes you need to do this for, even though they're the same material.
color and color 1 add your emission hue shift (any you want to change colors) (color is 0, color 1 is 100)
emission and emission 1 - go down to Post Processing in the material and in PP Animation. Change Emission Multiplier, 0 for emission, 1 for emission 1.
lighting and lighting 1 - in Post Processing, PP Animation, Change Lighting Multiplier. 0 for lighting, 1 for lighting 1.
audiolink_on_off - go to Audiolink and for the first time stamp (0:00) make sure the Anim Toggle is checked on. at the second time stamp (0:01) make sure its off.Now everything is color matched, lighting matched, emission matched, and set up for audio link
Screenshots to help as wellB1TTY
Mask for Decal
Decal Settings
https://gyazo.com/167d54e6f8754005ab3284ad9bee52b9
FL4T Settings
https://gyazo.com/a73923eb8042060e02375b1fcc1ae675
M.E.G.A. Chassis Settings
https://gyazo.com/863576b9f7ae034f96f00c46d7b2bd7e
Emission Hue Shift Location
https://gyazo.com/0f2a028743d28d178322d103f524533a
Audiolink and Post Processing Location
https://gyazo.com/e6eac0f7f5eec5fc979da00b7a5d78a0@FemboyWaifu Thank you so much! I'll give this a whirl later on tonight. o7
-
-
Bump for human skin to Chassis update~
@CoolGuyMeikai You can do the above for now while we wait
-
Okay, sorry for the long wait. Firstly... be careful everyone, Tori is bringing down ban hammer in his server. Friend of mine already got hit. And that also means most likely the other creators have been informed too, so, be on guard.
As for the modded textures - here's how I did the materials for the B1TTY, M.E.G.A. Chassis and FL4T Chest
For the modded textures, and this part works for both skin tones, I dropped the base texture into another art app just to get the color code - for the dark skin it
Light Skin's Hexadecimal code is FFE7DA
Dark Skin's is 63524A
What I did was make a texture thats nothing but that color. You're going to use it for all three.
For the B1TTY: In the material go to Decal, add the color texture to "Decal" and this mask I made into the Decal RGBA Mask. Make sure decal is on. Next go to the Matcaps. Turn off Matcap 1 and 3 to remove the shine since the rest of the skin is very matte, it looks VERY off putting. When I was working on it like 6 friends pointed that out within 5 minutes at an event lol.M.E.G.A. Chassis - add the texture to decal, same way. Turn off Matcap 0 and 3 (2 is blank, but make sure its off too)
FL4T Chest - add the texture to the Main in Colors & Normals. Turn off Matcap 0, 2 and 3.And now they should all have the same (for the light skin tone, might be a little off because i didn't make that one, i used color grab just to get it from the texture in Unity for a friend) as well as the same matte look.
For the hair and anything else to add the color, you'll have to add them to the animations. The problem with almost every Raruh part is the creators just used the original FX Layer and then give that to you and tell you just use that as well as replace the animations with theirs. That's fine if you only have one, or in one case I think all the creator's parts are on the animation. But if you have multiple creator's mods, you're going to have to add them to the animations manually.
So for any additional part if you wanna just add it to what you already have in the animations you need to edit the following to make sure they match with RGB, Emission strength, Lighting strength and Audiolink. For anyone who hasn't done animation stuff, I'll give the TLDR. Make a copy of your model, Add the FX Layer you're going to edit to its Controller in Animator (when you click the model you'll see it in Inspection at the top). Go to animation and you can now find the one you're going to edit. Make sure any material you're going to be adding is active just so you don't have to worry about adding things to it like turning on and off. Now when you hit record, you can edit the material and add it. These are what you're going to want to add on to each one. Make sure that after you put the value in, you hit record again so it saves it. I do it after each one, just to be sure. For the M.E.G.A. Chassis, you need to do this for each one you're using, so Booba_NSFW, Booba_SFW_Side, Booba_SFW_Top, and Tubes you need to do this for, even though they're the same material.
color and color 1 add your emission hue shift (any you want to change colors) (color is 0, color 1 is 100)
emission and emission 1 - go down to Post Processing in the material and in PP Animation. Change Emission Multiplier, 0 for emission, 1 for emission 1.
lighting and lighting 1 - in Post Processing, PP Animation, Change Lighting Multiplier. 0 for lighting, 1 for lighting 1.
audiolink_on_off - go to Audiolink and for the first time stamp (0:00) make sure the Anim Toggle is checked on. at the second time stamp (0:01) make sure its off.Now everything is color matched, lighting matched, emission matched, and set up for audio link
Screenshots to help as wellB1TTY
Mask for Decal
Decal Settings
https://gyazo.com/167d54e6f8754005ab3284ad9bee52b9
FL4T Settings
https://gyazo.com/a73923eb8042060e02375b1fcc1ae675
M.E.G.A. Chassis Settings
https://gyazo.com/863576b9f7ae034f96f00c46d7b2bd7e
Emission Hue Shift Location
https://gyazo.com/0f2a028743d28d178322d103f524533a
Audiolink and Post Processing Location
https://gyazo.com/e6eac0f7f5eec5fc979da00b7a5d78a0@FemboyWaifu Hey so I did everything up until the hair, thank you btw, but I'm still confused with how to sync up the hair color with the rest of the body x.x .
Is the hair already in the animator? If so what's it called specifically, cause I'm not seeing a hair layer.
I'm seeing the hairs and hair_extra in the animation, but with it being set to 0 for color and 1 for color 1, it's still green by default. Am I doing something wrong?
Aha! I found the easiest solution. Gonna provide steps for those who aren't as great like myself:- Click hair
- Unlock shader/material
- Scroll down to Special FX, go to Emission 0
- Checkmark the Replace Base Color
- Click on the Emission Color, and with the color-picking tool, on the body, click one of the already lit-up areas (so for example, mine are all pink by default, so I clicked on a pink light on the body).
- ez-pz
(Obviously do this with hair_extra, too)
-
@FemboyWaifu Hey so I did everything up until the hair, thank you btw, but I'm still confused with how to sync up the hair color with the rest of the body x.x .
Is the hair already in the animator? If so what's it called specifically, cause I'm not seeing a hair layer.
I'm seeing the hairs and hair_extra in the animation, but with it being set to 0 for color and 1 for color 1, it's still green by default. Am I doing something wrong?
Aha! I found the easiest solution. Gonna provide steps for those who aren't as great like myself:- Click hair
- Unlock shader/material
- Scroll down to Special FX, go to Emission 0
- Checkmark the Replace Base Color
- Click on the Emission Color, and with the color-picking tool, on the body, click one of the already lit-up areas (so for example, mine are all pink by default, so I clicked on a pink light on the body).
- ez-pz
(Obviously do this with hair_extra, too)
@EmiliaSilvie Ah - yeah, i explained how to add it to the RGB slider. I didn't think to add that part too >.< and I did that for myself. Sowwy about that.
-
@EmiliaSilvie Ah - yeah, i explained how to add it to the RGB slider. I didn't think to add that part too >.< and I did that for myself. Sowwy about that.
@FemboyWaifu You're all good dw, I'm still learning xD
-
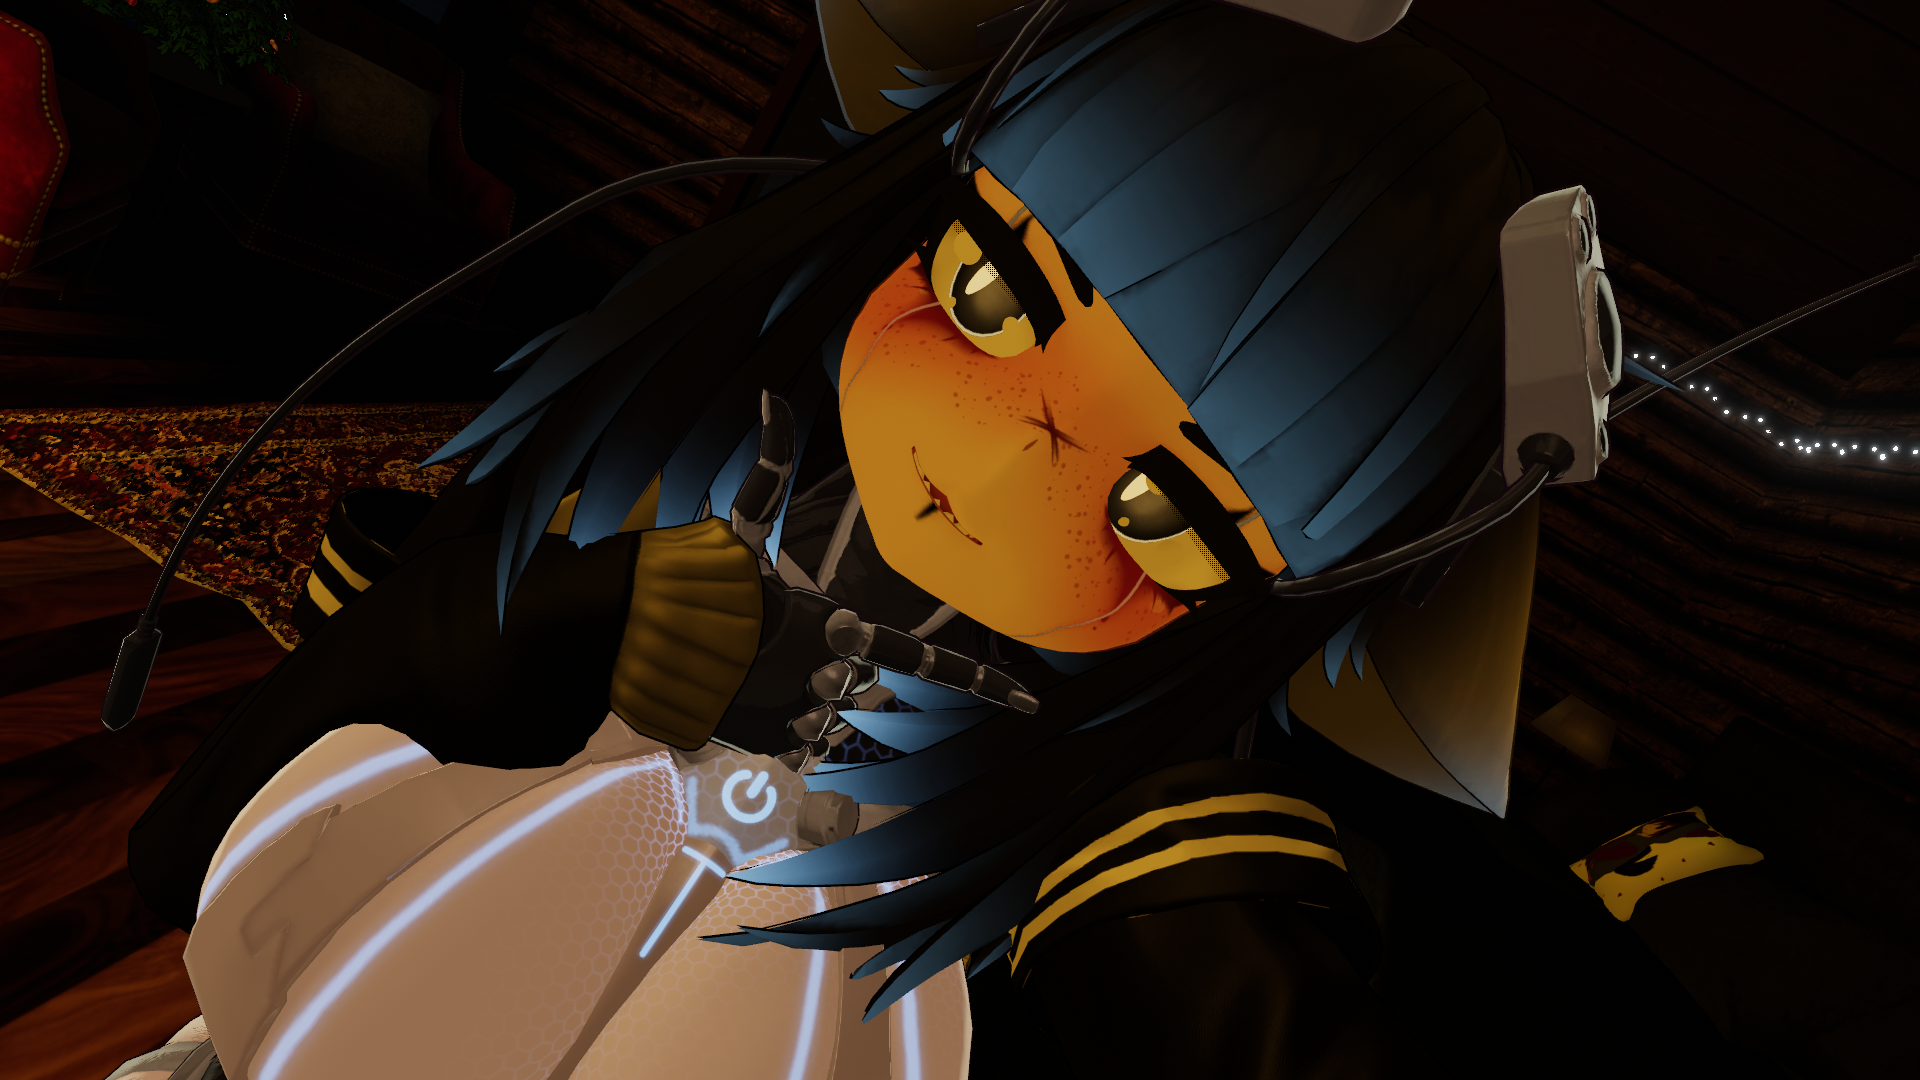
What about the body looking like this? Is it just the world I'm in that's making her look like this or did I miss something?



Hello! It looks like you're interested in this conversation, but you don't have an account yet.
Getting fed up of having to scroll through the same posts each visit? When you register for an account, you'll always come back to exactly where you were before, and choose to be notified of new replies (either via email, or push notification). You'll also be able to save bookmarks and upvote posts to show your appreciation to other community members.
With your input, this post could be even better 💗
Register Login