Skip to content
  • Categories
  • Recent
  • Tags
  • Popular
Skins
  • Light
  • Brite
  • Cerulean
  • Cosmo
  • Flatly
  • Journal
  • Litera
  • Lumen
  • Lux
  • Materia
  • Minty
  • Morph
  • Pulse
  • Sandstone
  • Simplex
  • Sketchy
  • Spacelab
  • United
  • Yeti
  • Zephyr
  • Dark
  • Cyborg
  • Darkly
  • Quartz
  • Slate
  • Solar
  • Superhero
  • Vapor

  • Default (Zephyr)
  • No Skin
Collapse
RipperStore Logo
  1. Home
  2. Assets
  3. Looking for...
  4. Textures
  5. LF: Hypno Eyes Shader 3.0 and Hypno Preset Pack by Value Factory

LF: Hypno Eyes Shader 3.0 and Hypno Preset Pack by Value Factory

Scheduled Pinned Locked Moved Textures
hypnoeyesshadershadersfurry
63 Posts 24 Posters 30.1k Views 40 Watching
  • Oldest to Newest
  • Newest to Oldest
  • Most Votes
Reply
  • Reply as topic
Log in to reply
This topic has been deleted. Only users with topic management privileges can see it.
  • M MaxTech

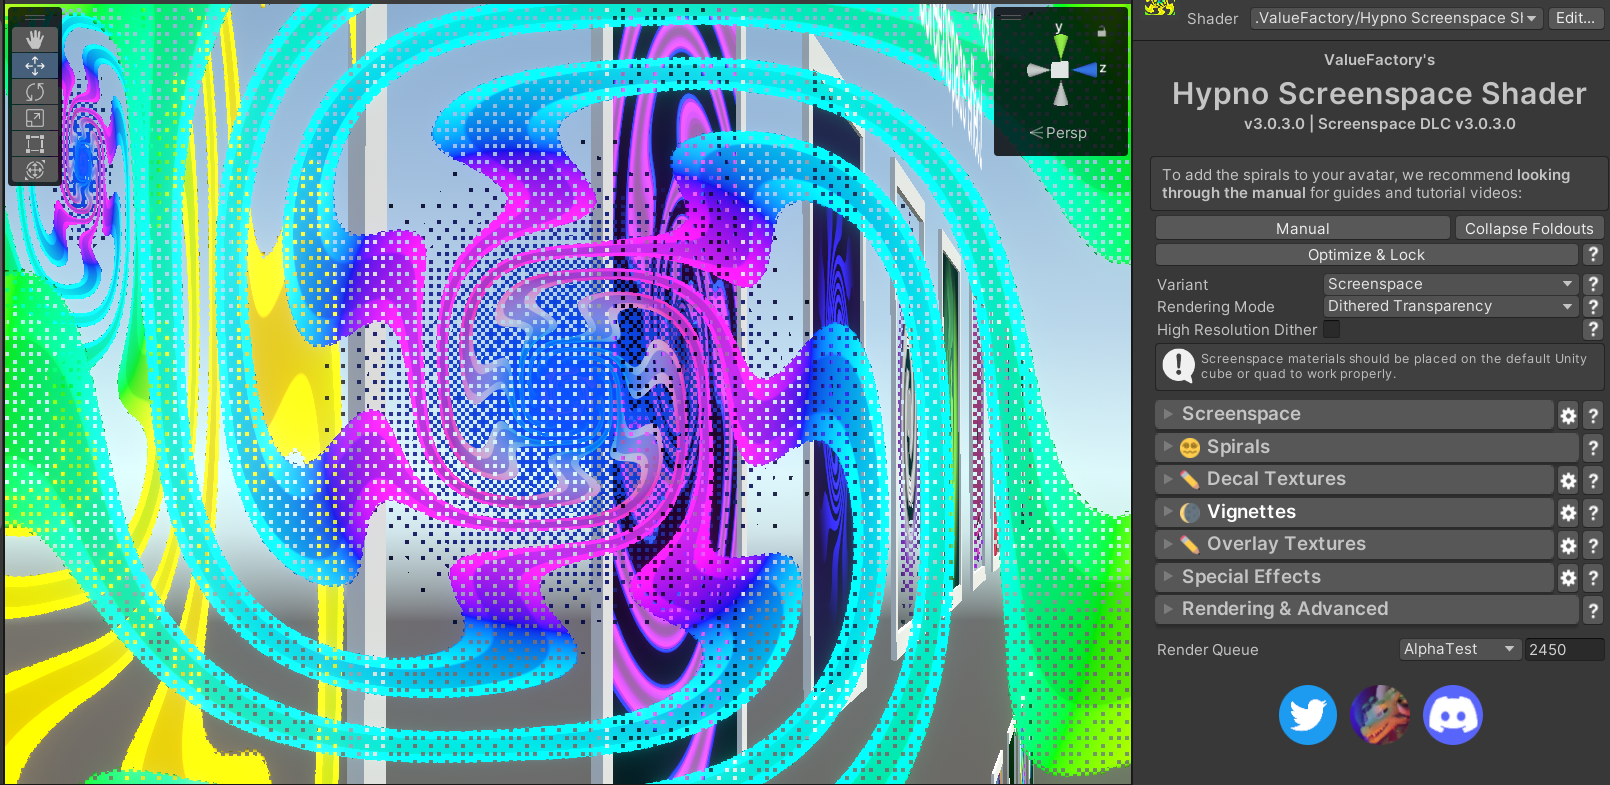
    New updated DLL upload (it still worked as intended but GUI now shows proper number, anyway enjoy)

    Base
    image.png

    Focus DLC
    image.png

    ScreenSpace
    image.png

    Download link:
    🔗 Download Link (mediafire.com)
    (file is updated, too lazy to rename the 7z file)
    same install instructions.
    Open Explorer, go to the root of the unity Project. Extract and overwrite.

    ThroughTheWireT
    ThroughTheWireT
    ThroughTheWire
    wrote on last edited by
    #29

    @MaxTech I don't think I understand how to install, sorry. I'm kinda new to this. Could you elaborate?

    Through the fire, to the limit, to the wall. For the chance to be with you, I'd gladly risk it all.

    M 1 Reply Last reply
    -1
    • ThroughTheWireT ThroughTheWire

      @MaxTech I don't think I understand how to install, sorry. I'm kinda new to this. Could you elaborate?

      M
      M
      MaxTech
      wrote on last edited by
      #30

      @ThroughTheWire d9aed982-0860-4e01-9c3f-5d6ca8a7b883-image.png
      Extract contents to the your VRC Project's main folder. When it asks to overwrite the Packages folder and its contents, do so. it's that simple.

      ThroughTheWireT M 2 Replies Last reply
      ♥
      2
      • M MaxTech

        @ThroughTheWire d9aed982-0860-4e01-9c3f-5d6ca8a7b883-image.png
        Extract contents to the your VRC Project's main folder. When it asks to overwrite the Packages folder and its contents, do so. it's that simple.

        ThroughTheWireT
        ThroughTheWireT
        ThroughTheWire
        wrote on last edited by ThroughTheWire
        #31

        @MaxTech Okay, thank you!
        Does the dll work for all 3 files?

        Through the fire, to the limit, to the wall. For the chance to be with you, I'd gladly risk it all.

        M 1 Reply Last reply
        0
        • ThroughTheWireT ThroughTheWire

          @MaxTech Okay, thank you!
          Does the dll work for all 3 files?

          M
          M
          MaxTech
          wrote on last edited by
          #32

          @ThroughTheWire Yes, as evidence the screenshots are there.

          1 Reply Last reply
          0
          • M MaxTech

            @ThroughTheWire d9aed982-0860-4e01-9c3f-5d6ca8a7b883-image.png
            Extract contents to the your VRC Project's main folder. When it asks to overwrite the Packages folder and its contents, do so. it's that simple.

            M
            M
            meowmmoremuma
            wrote on last edited by
            #33

            @MaxTech hi im sorry but I really Dont understand how to do this. Could you break it down even more? I'm so confused

            1 Reply Last reply
            0
            • jaxoyJ
              jaxoyJ
              jaxoy
              wrote on last edited by
              #34
              This post is deleted!
              1 Reply Last reply
              -1
              • BabyMephiB
                BabyMephiB
                BabyMephi
                wrote on last edited by
                #35

                @meowmmoremuma @jaxoy

                Here are instructions, complete with imagery to help guide you properly.

                1. To install the bypass, first open your Unity Project and import the Hypno asset from the .unitypackage that you have. When it pops up asking for a license, just close the window and move on to the next step.

                2. At the bottom of your Unity window is your Asset browser for you project. On the lext side it has a File Tree that lists things like Favorites, Assets, Packages. Find "Packages", right click it and select "Show in Explorer" to open it in Windows File Explorer or whichever relevant file explorer your system is set to use.
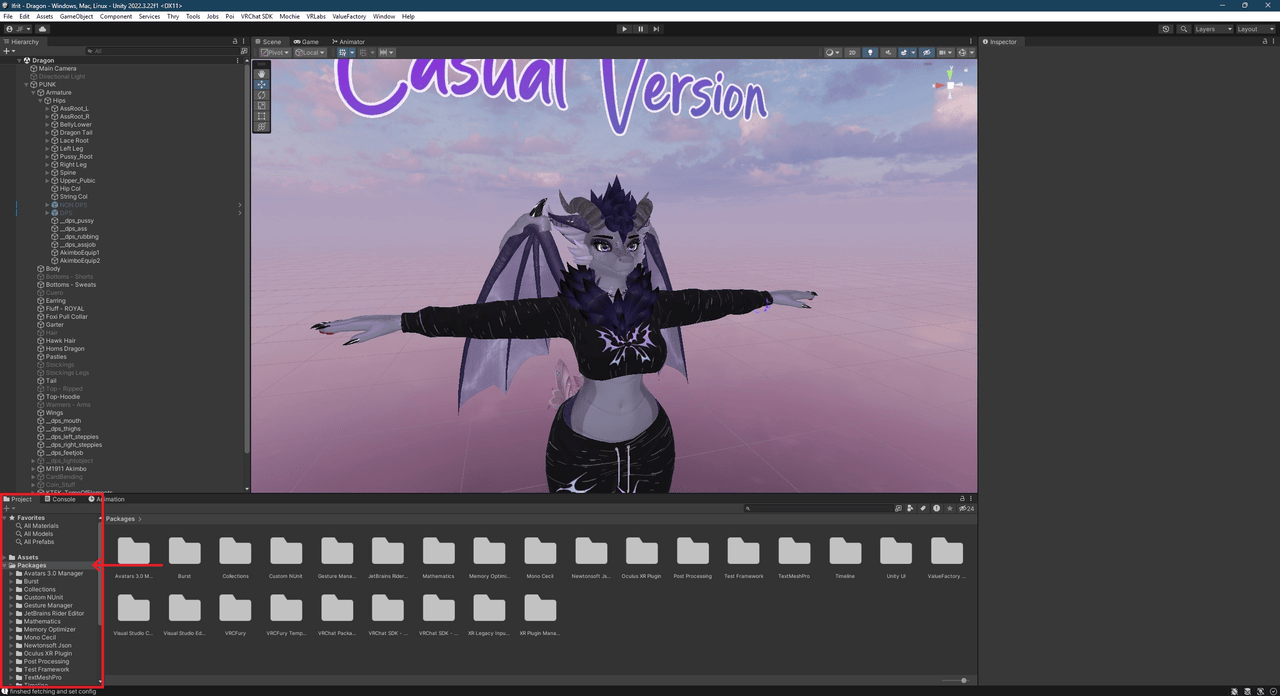
                  Screenshot_41.png

                3. This will take you to where packages is located in your Windows/Mac/Linux files. Locate your .zip file that contains the bypass and open it up.

                4. Drag the "Packages" folder out of the .zip file and into your Unity project folder that contains the existing "Packages" folder and overwrite them.
                  Screenshot_44.png
                  Screenshot_45.png

                5. You are now done! Enjoy your cracked shaders!

                jaxoyJ N 2 Replies Last reply
                ♥
                4
                • BabyMephiB
                  BabyMephiB
                  BabyMephi
                  wrote on last edited by
                  #36

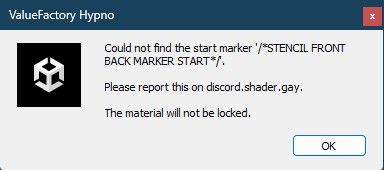
                  My only real issue now is that I seem to get this error when using the shaders on my avatar. If I attempt to lock the material, or try to upload my avatar, then this warning pops up and prevents me from doing either. Anyone possibly know what causes it and/or how to fix it? Using the latest 3.0 version.

                  Screenshot_42.jpg

                  BabyMephiB 1 Reply Last reply
                  💗
                  2
                  • BabyMephiB BabyMephi

                    My only real issue now is that I seem to get this error when using the shaders on my avatar. If I attempt to lock the material, or try to upload my avatar, then this warning pops up and prevents me from doing either. Anyone possibly know what causes it and/or how to fix it? Using the latest 3.0 version.

                    Screenshot_42.jpg

                    BabyMephiB
                    BabyMephiB
                    BabyMephi
                    wrote on last edited by
                    #37

                    Adding to this to say that using the old DLL that states 3.0.1.1 instead of 3.0.3.0 fixed this issue for some reason. Not sure why that would be.

                    M 1 Reply Last reply
                    😲
                    1
                    • BabyMephiB BabyMephi

                      Adding to this to say that using the old DLL that states 3.0.1.1 instead of 3.0.3.0 fixed this issue for some reason. Not sure why that would be.

                      M
                      M
                      MaxTech
                      wrote on last edited by
                      #38

                      @BabyMephi hmm, probably I messed up with something else when I redid the crack. Good to know that the original one fixed the issue (for some reason). Will try to actually just edit the og one to the newer version number.

                      1 Reply Last reply
                      👍
                      0
                      • BabyMephiB BabyMephi

                        @meowmmoremuma @jaxoy

                        Here are instructions, complete with imagery to help guide you properly.

                        1. To install the bypass, first open your Unity Project and import the Hypno asset from the .unitypackage that you have. When it pops up asking for a license, just close the window and move on to the next step.

                        2. At the bottom of your Unity window is your Asset browser for you project. On the lext side it has a File Tree that lists things like Favorites, Assets, Packages. Find "Packages", right click it and select "Show in Explorer" to open it in Windows File Explorer or whichever relevant file explorer your system is set to use.
                          Screenshot_41.png

                        3. This will take you to where packages is located in your Windows/Mac/Linux files. Locate your .zip file that contains the bypass and open it up.

                        4. Drag the "Packages" folder out of the .zip file and into your Unity project folder that contains the existing "Packages" folder and overwrite them.
                          Screenshot_44.png
                          Screenshot_45.png

                        5. You are now done! Enjoy your cracked shaders!

                        jaxoyJ
                        jaxoyJ
                        jaxoy
                        wrote on last edited by
                        #39

                        @BabyMephi Thank you for this, it worked perfectly, you explained it so well that I didn't need a video.
                        Though I have no idea still how to use this shader on a booth model yet, it's a step. :'D

                        BabyMephiB 1 Reply Last reply
                        👍
                        0
                        • jaxoyJ jaxoy

                          @BabyMephi Thank you for this, it worked perfectly, you explained it so well that I didn't need a video.
                          Though I have no idea still how to use this shader on a booth model yet, it's a step. :'D

                          BabyMephiB
                          BabyMephiB
                          BabyMephi
                          wrote on last edited by BabyMephi
                          #40

                          @jaxoy Underneath the shader in your Inspector on the right side of your Unity Window (when you have the material selected), there should be a section called "Quick Setup". Underneath that, there should be a section called "Manual Positioning". This manual positioning allows you to change the position of the shader to line up with the avatar's eyes, allowing it to be compatible with any avatar. It might be a good idea to fiddle around with this and try making it fit. Here's an image to show where I mean:
                          Screenshot_46.jpg

                          Hopefully this helps!

                          Edit: It's key to note that this does not seem to work on any of the materials under the "Examples" folder specifically. It will work on any custom materials or the materials under "Exotic Materials" and all the other folders except for "Examples".

                          jaxoyJ 2 Replies Last reply
                          0
                          • BabyMephiB BabyMephi

                            @jaxoy Underneath the shader in your Inspector on the right side of your Unity Window (when you have the material selected), there should be a section called "Quick Setup". Underneath that, there should be a section called "Manual Positioning". This manual positioning allows you to change the position of the shader to line up with the avatar's eyes, allowing it to be compatible with any avatar. It might be a good idea to fiddle around with this and try making it fit. Here's an image to show where I mean:
                            Screenshot_46.jpg

                            Hopefully this helps!

                            Edit: It's key to note that this does not seem to work on any of the materials under the "Examples" folder specifically. It will work on any custom materials or the materials under "Exotic Materials" and all the other folders except for "Examples".

                            jaxoyJ
                            jaxoyJ
                            jaxoy
                            wrote on last edited by
                            #41

                            @BabyMephi I'll try this out and see if it works, I'll lyk how it goes!! c':

                            1 Reply Last reply
                            👍
                            1
                            • GengarG
                              GengarG
                              Gengar
                              wrote on last edited by
                              #42

                              Well damn, wish I saw this thread before I bought the bundle.

                              𝕀𝕗 𝕞𝕪 𝕗𝕚𝕝𝕖𝕤 𝟜𝟘𝟜 𝕓𝕝𝕒𝕞𝕖 𝕥𝕙𝕖 𝕗𝕖𝕕𝕤
                              +𝕣𝕖𝕡 𝕞𝕖 𝕗𝕠𝕣 𝕞𝕠𝕣𝕖 𝕝𝕖𝕒𝕜𝕤

                              1 Reply Last reply
                              0
                              • BabyMephiB BabyMephi

                                @jaxoy Underneath the shader in your Inspector on the right side of your Unity Window (when you have the material selected), there should be a section called "Quick Setup". Underneath that, there should be a section called "Manual Positioning". This manual positioning allows you to change the position of the shader to line up with the avatar's eyes, allowing it to be compatible with any avatar. It might be a good idea to fiddle around with this and try making it fit. Here's an image to show where I mean:
                                Screenshot_46.jpg

                                Hopefully this helps!

                                Edit: It's key to note that this does not seem to work on any of the materials under the "Examples" folder specifically. It will work on any custom materials or the materials under "Exotic Materials" and all the other folders except for "Examples".

                                jaxoyJ
                                jaxoyJ
                                jaxoy
                                wrote on last edited by
                                #43
                                This post is deleted!
                                xXAlphaWolfXxX BabyMephiB 2 Replies Last reply
                                -1
                                • jaxoyJ jaxoy
                                  [[topic:post-is-deleted]]
                                  xXAlphaWolfXxX
                                  xXAlphaWolfXxX
                                  xXAlphaWolfXx
                                  wrote on last edited by
                                  #44

                                  @jaxoy Shaders don't typically "move" unless the shader calculates view position or world position; this is not a default behaviour, it is something that needs to be added to a shader. The shader uses UV coordinates for the position of the middle of the eye. So no, it does not have any parallax or position-based behaviours and yes, it will move with the eyes.

                                  Owing allegiance to neither God nor man
                                  Intellectual property is for chudcels

                                  1 Reply Last reply
                                  1
                                  • jaxoyJ jaxoy
                                    [[topic:post-is-deleted]]
                                    BabyMephiB
                                    BabyMephiB
                                    BabyMephi
                                    wrote on last edited by BabyMephi
                                    #45

                                    @jaxoy Like what @xXAlphaWolfXx said in their post. The shader should be attached to the eyes if the avatar is made correctly and the shader is attached to the correct part of the avatar. So they should move with the eyes rather than separately.

                                    jaxoyJ 1 Reply Last reply
                                    0
                                    • BabyMephiB BabyMephi

                                      @jaxoy Like what @xXAlphaWolfXx said in their post. The shader should be attached to the eyes if the avatar is made correctly and the shader is attached to the correct part of the avatar. So they should move with the eyes rather than separately.

                                      jaxoyJ
                                      jaxoyJ
                                      jaxoy
                                      wrote on last edited by
                                      #46

                                      @BabyMephi I don't really know why I don't understand how to do this, I've tried youtube videos and see how to put eye shaders on a model, but it never looks right. 😕

                                      BabyMephiB 1 Reply Last reply
                                      0
                                      • jaxoyJ jaxoy

                                        @BabyMephi I don't really know why I don't understand how to do this, I've tried youtube videos and see how to put eye shaders on a model, but it never looks right. 😕

                                        BabyMephiB
                                        BabyMephiB
                                        BabyMephi
                                        wrote on last edited by
                                        #47

                                        @jaxoy Sorry for the late response. I guess I'll have a go with one of the booth avatars I have and see what I can find.

                                        1 Reply Last reply
                                        0
                                        • TheCoolioT
                                          TheCoolioT
                                          TheCoolio
                                          wrote on last edited by
                                          #48

                                          Bumping since the topic stepped off its direction a bit. Bumping for presets!

                                          1 Reply Last reply
                                          0
                                          • H Hartley referenced this topic on

                                          Hello! It looks like you're interested in this conversation, but you don't have an account yet.

                                          Getting fed up of having to scroll through the same posts each visit? When you register for an account, you'll always come back to exactly where you were before, and choose to be notified of new replies (either via email, or push notification). You'll also be able to save bookmarks and upvote posts to show your appreciation to other community members.

                                          With your input, this post could be even better 💗

                                          Register Login
                                          Reply
                                          • Reply as topic
                                          Log in to reply
                                          • Oldest to Newest
                                          • Newest to Oldest
                                          • Most Votes


                                          • Login

                                          • Login or register to search.
                                          • First post
                                            Last post
                                          0
                                          • Categories
                                          • Recent
                                          • Tags
                                          • Popular