Booth model to MMD
-
Hello, when converting to pmx this happens but not with all models, any solution to this problem? if there is a tutorial much better https://imgur.com/a/tsifFB3
-
@Marce18 don't know how to register morphs in pmxe or even if you can. there was once a reverse morph plugin for pmxe on bowlroll
but i can't seem to find it.
found it: https://bowlroll.net/file/195157quick tutorial if you were unsure:
open up your model in pmxe, go to Edit > Run DLL

Drag and drop the dll in the dll box and then hit the button in the bottom right

Select (highlighted) the morph you want to reverse, hit the big button at the bottom and bob's you're uncle, desever hprom

Don't forget to save you're model afterwards of course =P
-
 E eiron referenced this topic on
-
what i uploaded in my first post in this thread is the most up to date that i have.
Are you having trouble converting something?
If it's a physics related issue. more often than not I get rid of the physics from an exported model.
I think the vrc physics settings are different to pmx. so often the physics will come out really really twitchy and sometimes entire models collapsing or exploding into mess off distorted meshes. Sometimes it might be okay, but not as good as the vrc physics (whether dynamic of physbone).
What you can do if a model also comes with a .vrm file use this converter https://workupload.com/file/BjP3CzCHERE
and then copy the physics from that and add it to the unity exported one (as the unity will one will be a higher quality model).
you can do so by selecting all the rigid bodies and joints in PMXE and saving them as .csv files ( have to do both separately)
and then make sure you load the rigid bodies back in first than the joints.
Another thing i do is is find a similar sized model and copy the breast physics from that. usually have to copy some bones too as they might be dependent on that and then tweak the rigid bodies till they bounce just the right amount
These aren't particularly goods way to do it, but as i don't know enough about unity or mmd physics to do things correctly, it's what i came up with to get by.
I generally avoid skirts or long hair as the physics for them never work for me when exporting and often just find them flopping about and clipping just distracting.
Though i did kinda skip over the physics section of the converter readme (posted in earlier post in this thread)an excerpt from the readme:
Post-processing
The PMX file can be loaded into MMD as is but the physics can be anywhere from acceptable to terrible. You'll have to spend some time in PMXEditor or Blender to clean things up. Below are some common post-processing tasks.Check for overlapping rigid bodies
Dynamic Bone colliders generate bone tracking rigid bodies that are too big and often intersect with other rigid bodies. This is the most common cause of jittery physics. Shrink the rigid bodies until they no longer overlap or remove them completely if they are problematic.Adjust physics parameters
As previously mentioned, the default parameters are tuned for hair and may not work well for other physics types. The most important parameter to adjust is joint rotation limit, followed by joint spring constants and rigid body physics settings with roughly equal importance. If you don't know what values to use, look at other PMX models as a reference.Add additional Rigid Body colliders
Most avatars come with very few Dynamic Bone colliders compared to a typical PMX model which has bone tracking rigid bodies for arms, legs and torso. Without these additional rigid bodies you may run into clipping issues.Adjust collision groups
To reduce rigid body jittering, all rigid bodies are set to no collisions except with the bone tracking rigid bodies in group 1. If you are feeling confident you can try enabling collisions for other groups.Normalize vertex weights
In the main PMXEditor window, select Edit/Vertex/Normalize. Vertex weights are BDEF4 regardless of the actual number of bones, this cleans it up.Run Semi-Standard Bones plugin
Select all options and run the plugin. This adds a few additional bones such as upper arm twist bone. -
@eiron Hello, a question, do you know why the pmx exporter does not take certain materials such as metal or others (see image) https://imgur.com/a/h4Vboxv in some models? because I already tried updating liltoon but nothing happened and the models in pmx remain white in the parts of their selected clothing, I don't know if you understood but I'm looking for a solution, thank you
-
base mmd/pmx doesn't support shaders or normal maps, so if a model has a lot of them, it will not look as good.
(however there are third party shader plugins and stuff for mmd, like ray-mmd, that allows for normal maps, and drastically improve the look of your model through lighting adn other effects)
as for metals and shine textures you can copy them from your unity project folder (right click them in unity and open folder location) and put them in the pmx texture folder then go the the material tab in pmx editor, choose the material, then in the SPH section, click the little blue box to the right and then choose metal or shine texture, then choose add sphere or multi sphere, whichever looks best. don't forget to save afterwards.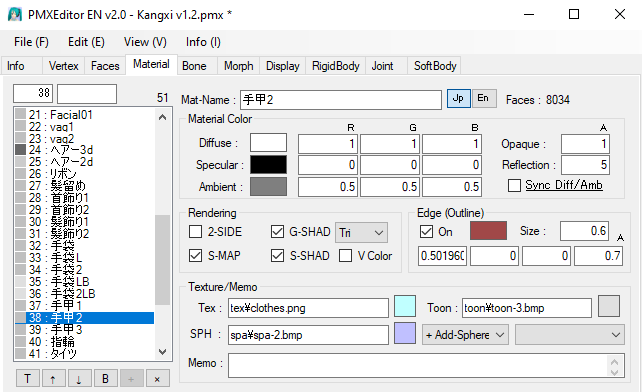
if you want more in depth knowledge for anything on the mmd side of things, i suggest you ask in the mmd threads on 4chan,.
my knowledges is very limited, I only know the basics stuff, but i learned it all there over the past couple of years
https://boards.4chan.org/e/thread/2823507 -
.mat files aren't the actual textures, it's more of a reference that point to where the actual texture is. Find where you have your unity project saved, and open the Assets folder and in the search bar put in .jpg, or .png or .bmp and you can find them that way. but you should be able to open them from unity. don't go to the material folder but find the actual texture folder for them.
-
E eiron referenced this topic on
-
E eiron referenced this topic on
